
Guide to Planning a Road Trip: The Funnel Method
Since the advent of the automobile, people have taken to the road to experience a faster mode of transport (compared to say, a horse). Since the invention of the airplane, the road trip has become slow travel.
Road trips are amazing because they allow you to see the scenery and sights along the way. Sometimes there isn’t even a destination, instead there are multiple destinations along a route.
I love trip design, and a road trip is the kind of trip I have planned more than any other kind. I’ve developed a process over the years, and as I sketched it out for this guide, I’ve nicknamed it the funnel method. We’ll start broad and narrow down to finer and finer details.
To make it easy to use this method, I’ve created a companion set of road trip planning printables, which includes an explanation of how to use them. (NOTE: COMING SOON!)
But wait? Is a road trip the right choice for your next vacation? If your answer is a resounding YES! then read on. If you’re unsure, expand this little tab to read my thoughts about when to road trip, and when not to.
I’ve planned a lot of road trips and have developed a process over the years. I am nicknaming this the funnel method because it starts with generating ideas, and then as planning progresses, the itinerary gets more and more fine-tuned as I navigate the details.
Don’t worry, even though I made a pretty little infographic, this doesn’t need to be complicated. What follows is just a guide, use it as much or as little as you like.
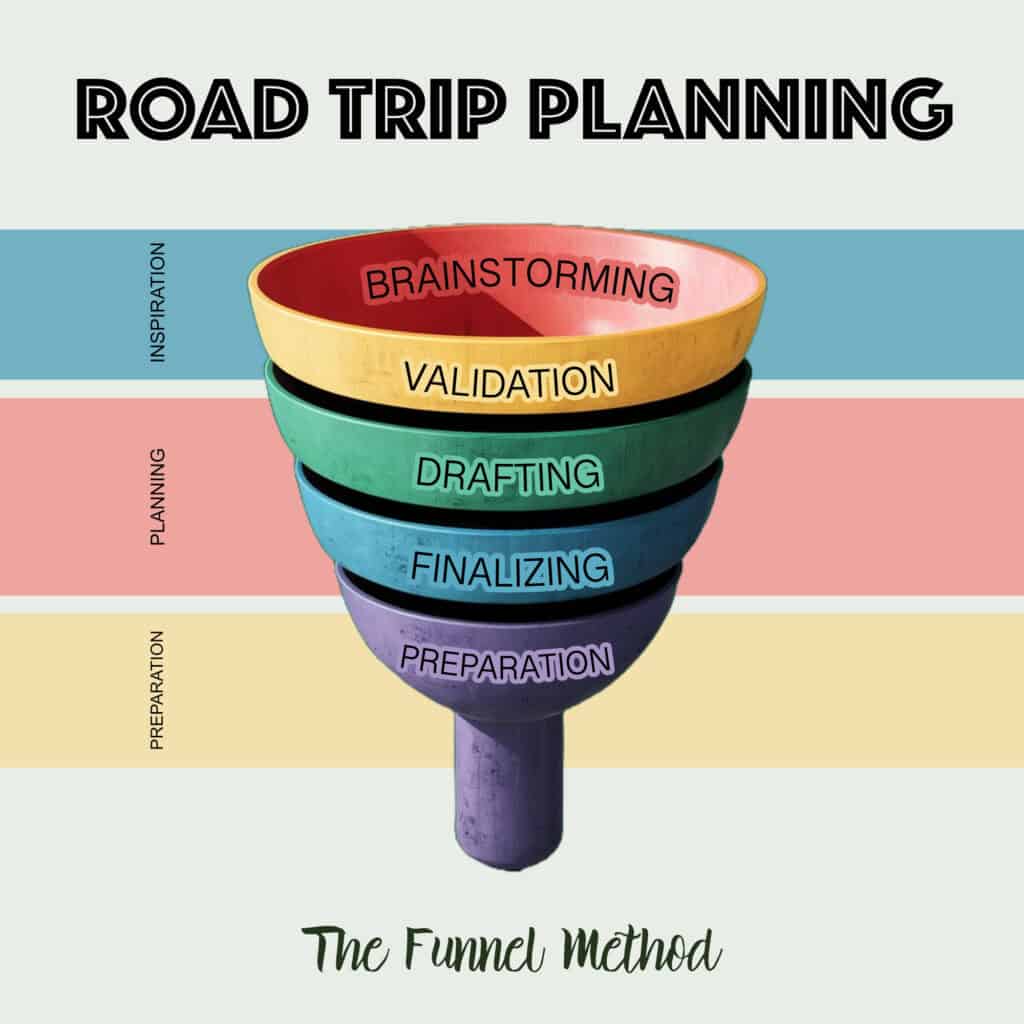
Phase 1: Brainstorming Ideas for Where to Go
This phase is about inspiration–what appeals to me?
When starting to plan a road trip, the first step is deciding where to go. I like to begin by making a list of places that interest me. If you already know where you want to go, you can skip ahead to the next section.
I find lots of travel ideas by browsing travel guides and reading travel blogs. They often have great itineraries and suggestions. Sometimes, a simple picture or story in a magazine or newspaper can spark a road trip idea.
Be sure to note any bucket list locations that are within driving distance. If they are on your bucket list, they should get some priority standing because if not now, then when?
I may create a bookmark folder on my browser or a Pinterest board to save all this inspiration. These tools make it easy to keep everything in one place.
At this point, I may have already identified a clear preference for my trip. If not, I narrow down my list to 2-3 of my top choices.
When trying to pick which trip idea to plan, here are some things to take into consideration:
What kinds of things do you like to do?
| What I Like to Do | Try These Types of Locations |
|---|---|
| Swimming, surfing, laying on the beach | Ocean or lakefront towns |
| Hiking, wildlife viewing | National parks |
| Musuems, historical tours | Historic towns or sites |
| Photography, scenery (including dashboard tourism) | Scenic routes (usually off the main highways) |
Who am I traveling with? Are you traveling with children, pets, people with mobility issues? Not every location will be suitable for various travelers. Also, factor in what kind of places they are interested in (see table above).
How long do I have? It can be very easy to overplan a road trip to the point where it feels like all you do is drive and any stops you make feel like Chevy Chase and family at the Grand Canyon.
What is my budget? Some locations can be very expensive. I’m looking at you Banff, AB. But she’s not the only one.
What kind of vehicle will I be traveling with? Some mountainous or narrow roads are not suitable for large RV’s.
Am I (or anyone I am traveling with) squeamish about heights or prone to road sickness? I hate mountain roads with 10 inches of shoulder and no guard rail. It kept me from the Million Dollar Highway in Colorado, and you will never again catch me on HWY 1 in N. California headed southbound (the ocean cliff side).
Likewise, if anyone in your vehicle is prone to road sickness, a route with lots of mountainous curves (especially with nowhere to pull off) may kill some of the fun of a road trip.
Phase 2: You Know Where to Go, Now What? Initial Research and Pre-Planning
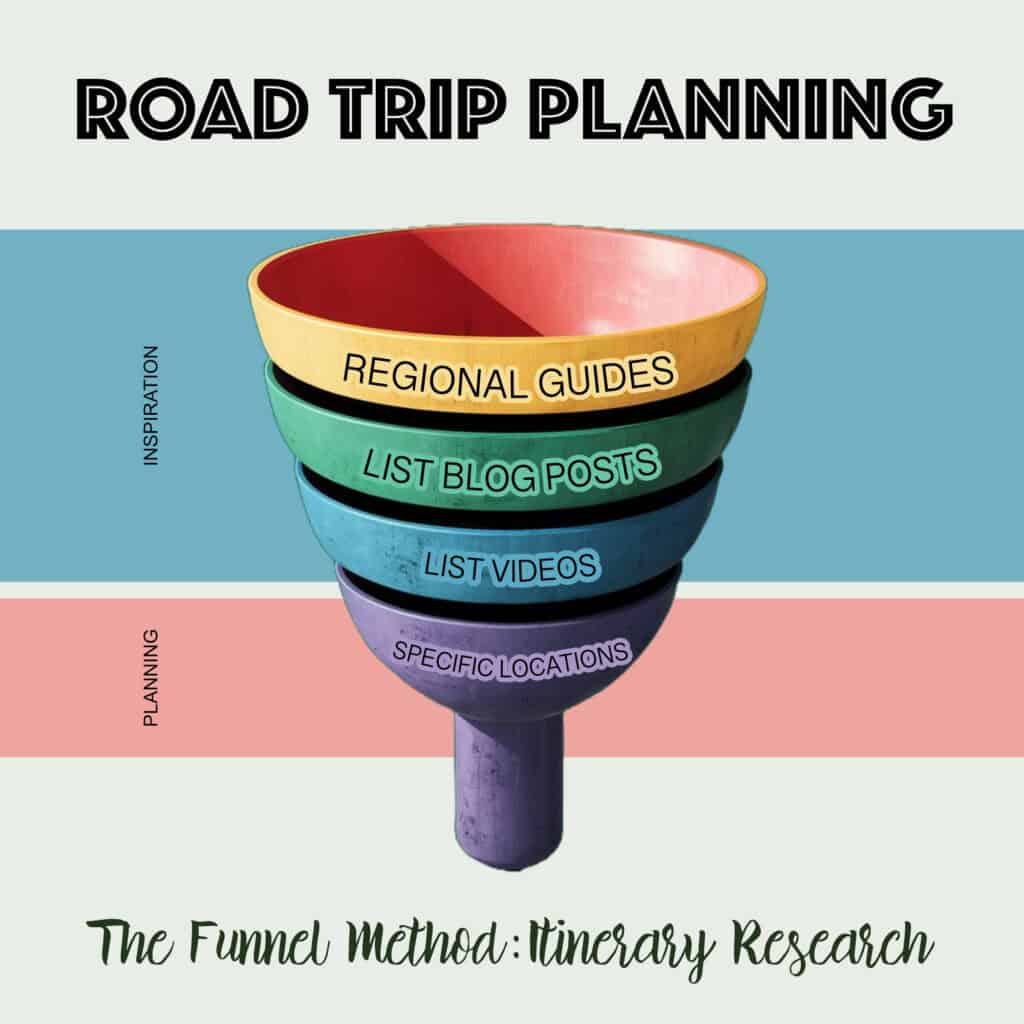
In this phase, we are still seeking inspiration, but we know our destination.
Now that you know where you are going, let’s start the first phase of constructing an itinerary. We want to start with looking at our proposed route and the surrounding area and making a list of all the things along the way that look interesting.
For this I turn to regional guide books. I get these from the library. As long as they are less than 5 years old they are good enough for this stage of planning.
The advantage of regional guide books (or state or province specific) is that they give you a good overview of the area you will be traveling.
Another good source is to look at a map and identify the towns along your way, and then search blog posts or Youtube videos about those places. Many of these posts/videos are lists of things to do, which can be handy, but often only cover the most popular places.
The disadvantage is these online sources tend to be more specific. What I mean is you’re much more likely to find videos and blog posts about what to do on the Olympic Peninsula and less so on what to do in the Pacific Northwest or the State of Oregon.
My favorite approach is to start with the the more broad guidebooks to create an initial list, and then use list style blog posts and videos of each town to fill in the gaps.
TIP: Start broad (regional) and then drill down to specific locations for more ideas. This is how you often find the hidden gem locations, by searching for what to do in specific towns.
By using a combination of guidebooks and lists from the internet, you can usually create a nice list of possible places to include on your itinerary. Remember, this phase is just about gathering some initial ideas.
Now that I have a list of possible things to do, I decide which are my must-do activities. These are the highlights I can’t miss.
STOP: What about Time and Money?
At this point I stop and do a little back of the napkin math. First, I want to make sure I can cover all of my must-do’s within the time I have, and secondly I want an idea of budget before I get too far.
- I check the total driving distance and time. It’s important to know how far I’ll be driving and for how long. Use Google Maps to add in the major points on your route to get an estimate of both distance and driving time.
- To get an idea of fuel costs, I divide the total miles by my car’s MPG. This will show me how many gallons or liters of gas I’ll need.
- I do a quick search for lodging costs. A simple online search using my planned dates gives me an idea of what I can expect to pay for a room. Just sample one or two locations, including the location you expect to be the most costly.
- To budget food and admissions, I add about $150 per day (for four people) to the lodging cost, assuming we will eat out once per day. This helps me estimate daily expenses without getting into too much detail. Average lodging cost + $150 = my estimated daily budget (used below). Read more about how I save money on food on the road.
- If your trip involves major attractions (like theme parks) then add in the cost of these separately since for a family of four, these can add up to an additional $400-600 a day.
- To get an idea of how many days I need, I divide total driving distance by about 200 miles. This is about 4 hours of daily drive time, give or take, allowing a few hours for breaks and sightseeing stops. Remember we are just trying to get an estimate at this point.
- I multiply the number of days by my estimated daily budget to get a rough estimate of the trip’s cost. Add in the cost of special attractions on top of this.
If the cost is too high, I think about which parts I can cut or shorten. This way, I ensure my trip fits within my budget.
Likewise, if I don’t have enough time to cover the whole distance, I look at where I can cut things out of my itinerary. Best to decide this now before you get too attached to your itinerary.
I aim for about 30-60 minutes on this budgeting research. Keeping it brief prevents me from getting bogged down in details.
By the end of this phase I have:
- A rough plan, but not a full itinerary
- I’ve validated that I have time for the trip and can afford it before I go any further
Phase 3: Itinerary Research–Creating a List of What to See
Planning: Now it is time to start planning in earnest.
You may already have some items on your list of places that are definite must-sees. Now is the time to evaluate the rest of the ideas you jotted down.
I find it helpful to search YouTube for videos about the places I am considering. Seeing these spots helps me decide if they are worth the hype.
For someone like me who doesn’t like narrow, winding or high roads without shoulders, I may also check out driving videos on YouTube. This allows me to preview the roads that I am concerned about and create alternate routes if needed.
Create a table (or use the worksheet in my road trip printables) with the places you want to see, including driving times between each as well as how long to allow at each location. Note if any attractions are closed on certain days of the week, or seasonally. Also note if reservations are recommended or required.
Add your locations to the table in order of travel. For example, Seattle to Portland, Portland to Cannon Beach, Cannon Beach to Newport, etc.
Add the driving times between each place. Google Maps usually gives fairly good estimates of driving time. Include the amount of time you’ll spend at each attraction. To keep things comfortable, I suggest allowing at least an hour for lunch and rest stops. If you prefer a sit-down lunch, allow more time.
Here’s an example of how I organize my list:
| From A to B | Drive Time | Attractions | Time to Allow | Notes |
|---|---|---|---|---|
| Seattle to Portland | 2 hr. 45 min | Powell’s Books OMSI | 2 hours 2 hours | Can buy OMSI tickets in advance |
| Portland to Cannon Beach | 1 hr. 25 min | Haystack Rock Shopping in town | 3 hours |
Phase 4: Drafting Your Route
Planning: Next, we will plan out our days.
Now you have a list of things to see in a logical order based on their location.
Finding good stopping points on your route makes the trip much more enjoyable. I like my total drive and attractions time to be around 7 hours. This way, I reach my hotel by late afternoon. It gives me time to unwind and explore the area around my lodging. Of course you can choose a shorter or longer time.
First, identify any places where you want to spend more than one full day. These are places where you will definitely be spending the night.
For the rest of the days, I add up both drive times and stop times and every time I get close to 7 hours, I write STOP in that row. This is where I might stop for the night. Don’t censor this process unless you know you have certain towns you definitely want to spend the night in.
Once you have written in your STOP points, review them and see if you want to make any adjustments: a shorter or longer driving day may be needed so you stop in locations that have good lodging choices, or that fit your plans better.
Now that you know where you are stopping each night, you can add in the dates to your table. This will help you in making reservations in the next step.
Before finalizing your route, double-check the details of your attractions. Make sure you know if they are closed on certain days and their opening hours. I do this on the official website of each attraction for the best accuracy. While you are on the website, note the cost of admission so you can budget properly.
Another thing to double check is whether any special events are happening in any of the locations along your route. Even if you don’t like to make reservations, if there is an event in a particular town you may have trouble finding a place to stay if you don’t plan ahead.
Phase 5: Finalize Your Itinerary and Make Reservations
Planning: Booking and reservations as needed.
These days I make hotel reservations along my whole route. I don’t want to waste time looking for lodging at the end of a driving day. I want to know that there is a room waiting for me.
Even if you are staying in a campground or hostel, check if you can make reservations. Discovering that the whole town is booked up can throw your itinerary off if you have to find accommodations elsewhere.
Search for places to stay at each stop on your trip. Sometimes, popular spots can be pricey or full, so don’t hesitate to check nearby towns for better options.
The days of 24 hour cancellation policies are fading. Many times you can save around $20 a night by consenting to a non-refundable room or a long cancellation window (e.g. 7 days). I would rather pay a little more to know I can cancel with <48 hours in case someone gets sick or something urgent comes up.
I usually don’t get trip insurance for a road trip, but consider if that might be worth the cost vs. just paying for the extra flexibility to cancel on shorter notice.
As you were creating your itinerary table, you should have noted which attractions require reservations. Now that you know where and when you will be there, you can make those reservations.
Also, check if you need any permits, park passes, or visas for your journey.
Make sure to double-check everything before you hit the road. That way, you can relax and enjoy your trip knowing that everything is taken care of.
Pre-Trip Tasks: Getting Ready to Go
Preparation: Now that your trip is planned, let’s look at pre-trip preparations.
Before heading out on a road trip, there are a few essential tasks to take care of.
- Make sure your car is in top shape. This means checking the oil, tires, brakes, and other vital parts. It’s a good idea to get a professional inspection to be safe.
- Think about getting trip insurance. This can help cover unexpected issues like car breakdowns, cancellations, or medical emergencies. I AAA/CAA for roadside assistance. As for medical issues, if you’re traveling abroad, consider getting out-of-country medical coverage. Check if your medical insurer covers you abroad.
- Let your banks or credit cards know if you plan to travel out of the country. This ensures they don’t put any holds on your cards for suspicious transactions. If you are using a credit card, hotels will often put holds or deposits on your card in excess of the room charge and it may take a day or two after you check out before they are released. Make sure you have enough credit line on your credit cards to avoid embarrassment. This can be especially a problem with prepaid credit cards (where you load up a balance).
- Make sure you have enough cash to cover road tolls, parking meters, or any other small transactions that may not accept cards. I have noticed some hotels requiring damage deposits lately, and while most of these are on a credit card, one required a cash deposit!
- Put a stop on your mail any subscriptions like newspapers and food boxes.
- Start making a list of what to pack
Here’s a list of things you might need to pack:
- Picnic supplies: Plates, napkins, and utensils.
- Cooler: Keep your drinks and snacks cold.
- Sleeping bags & pillows: If you plan on camping.
- First aid kit: Always good to have on hand.
- Medications: both prescription as well as pain relief or stomach relief
- Maps or GPS: Make sure you won’t get lost.
- Water, oil and other basics for roadside vehicle emergencies.
I always find it helpful to make a checklist of everything I need to pack. This keeps me organized and ensures I don’t forget anything important.
Making sure you have taken care of these pre-trip tasks can make your road trip smoother and more enjoyable.
While this may seem like a lot of work, I usually spread this out over a few weeks. I may browse a travel guide one evening, jotting down ideas. Another night I may be watching YouTube videos on my TV. And don’t forget, my road trip planning printables will walk you through this process step by step.
Drive safe!